MiniMax-H3 on RTX 5090 · part 11
A 25-second no-fog FPV one-take with MiniMax-H3 and ComfyUI-H3-Continuum on one RTX 5090
❯ cat --toc
- The result: four seams, none visible
- Step 1: Hide the upcoming landmark behind the camera
- Step 2: Install Continuum and use these settings
- Step 3: Put the sky at frames 124, 243, 362 and 481
- Step 4: Give each chunk its own prompt and its own reference images
- Step 5: Pin the ending with five reference images
- Set run_storage to Save + Auto Resume if you might redo a single chunk
- What's still off
- Deep dive: the measurements behind each step
- Smoke test: shared prompt and references replayed the story
- What the Continuum v3.9.8 source says
- How I measured the seams
- v1 seam numbers, and what the ending redo changed
- Seam 1's 4.37× window peak is camera motion, not a cut
- Finalize failed on disk space; the fix was RAM
- Full reruns reproduced the first 20 seconds almost bit for bit
- Timing and VRAM on one RTX 5090
- Coexistence with H3LongVideos
- Related
TL;DR
I made a 25-second FPV flight over Taiwan as one take with no fog, on one RTX 5090: Yushan, Taroko Gorge, Taipei 101, Sun Moon Lake, then a pull-up panorama. The four seams measure 1.28×, 0.86×, 0.33× and 0.15× the normal frame-to-frame change, and none of them shows as a cut. ComfyUI-H3-Continuum chains five 5-second MiniMax-H3 Ref2VA chunks, each starting from the previous chunk's last 22 frames, and every splice sits in a camera turn where the blockout shows only sky. Caveat: one seed per version, and a few spots still drift.
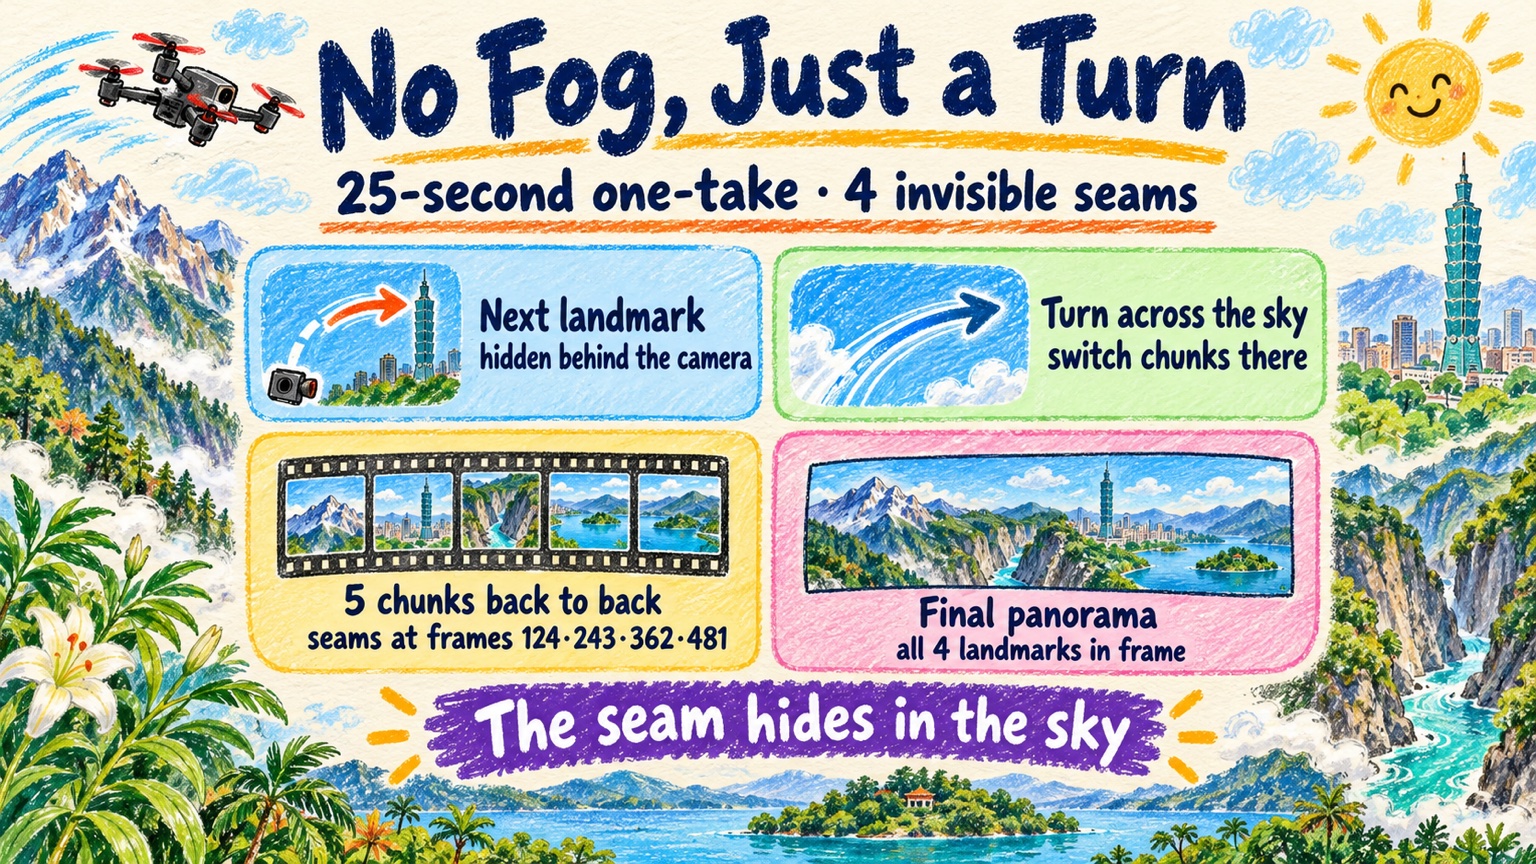
Yushan, Taroko Gorge, Taipei 101, Sun Moon Lake and a closing panorama in one 25-second take with no fog. Five MiniMax-H3 chunks joined by ComfyUI-H3-Continuum at 1344×768 on one RTX 5090
In Part 10 I flew an FPV drone shot over Taiwan with MiniMax-H3: three Ref2VA segments, each ending by flying into fog, crossfaded inside the fog, 22.7 seconds total. It looked like one take until you knew where to look. The fog seams read as soft dissolves, and I listed them under "not done yet."
This time I wanted the real thing. No fog. Fly straight from landmark to landmark, like the route line in the original Blender scene.
Three things stood in the way. H3 only generates a few seconds per run, so a long shot has to be split, and splits leave seams. Fog over a seam still reads as a crossfade. And when I tried naive continuation, chunk 2 replayed the story from the start: one frame was a foggy gorge, the next a sunny summit.
What finally worked was an idea I had, and it's simple. Hide the next landmark behind the camera, off to the rear right. Turn the camera toward it. While the frame shows nothing but sky, for less than a second, switch chunks. The seam hides in the sky.
The result is 25 seconds at 1344×768, 24 fps, from one RTX 5090. Below is the full workflow, then what's still off, then a deep dive with the measurements.
The result: four seams, none visible
The flight is Yushan → Taroko Gorge → Taipei 101 → Sun Moon Lake → a final pull-up panorama. It's five chunks of 5 seconds each, generated by MiniMax-H3 Ref2VA and chained by ComfyUI-H3-Continuum.
To check the seams I measured how much the picture changes across each splice, compared with a normal step from one frame to the next. 1.0× means the seam changes the picture as much as any other frame does. Higher means a jump.
| Seam | Change vs normal frame |
|---|---|
| 1 (Yushan → Taroko) | 1.28× |
| 2 (Taroko → 101) | 0.86× |
| 3 (101 → Sun Moon Lake) | 0.33× |
| 4 (Sun Moon Lake → panorama) | 0.15× |
For comparison, my failed smoke test hit 5.84× at its seam. Watching the final video, I can't see any of the four cuts.
Step 1: Hide the upcoming landmark behind the camera
The trick only works if the blockout gives H3 a moment of pure sky. So I rebuilt the Blender blockout (CPU, Workbench engine, not the 5090) with each upcoming landmark group moved to the rear right of the camera:
- Yushan → Taroko: the gorge group is rotated and moved rear right. The camera yaws 120° right, pitches up through the sky, then pitches down into the gorge.
- Taroko → Taipei 101: the tower and its city blocks sit behind the gorge exit. Yaw 120°, and the tower rises from the bottom edge of the frame.
- Taipei 101 → Sun Moon Lake: the lake, Lalu island and Ci'en pagoda are moved rear right. Yaw 145°.
- Sun Moon Lake → panorama: yaw 120°, pitch up until every landmark leaves the frame, climb, then pitch down onto the full scene.
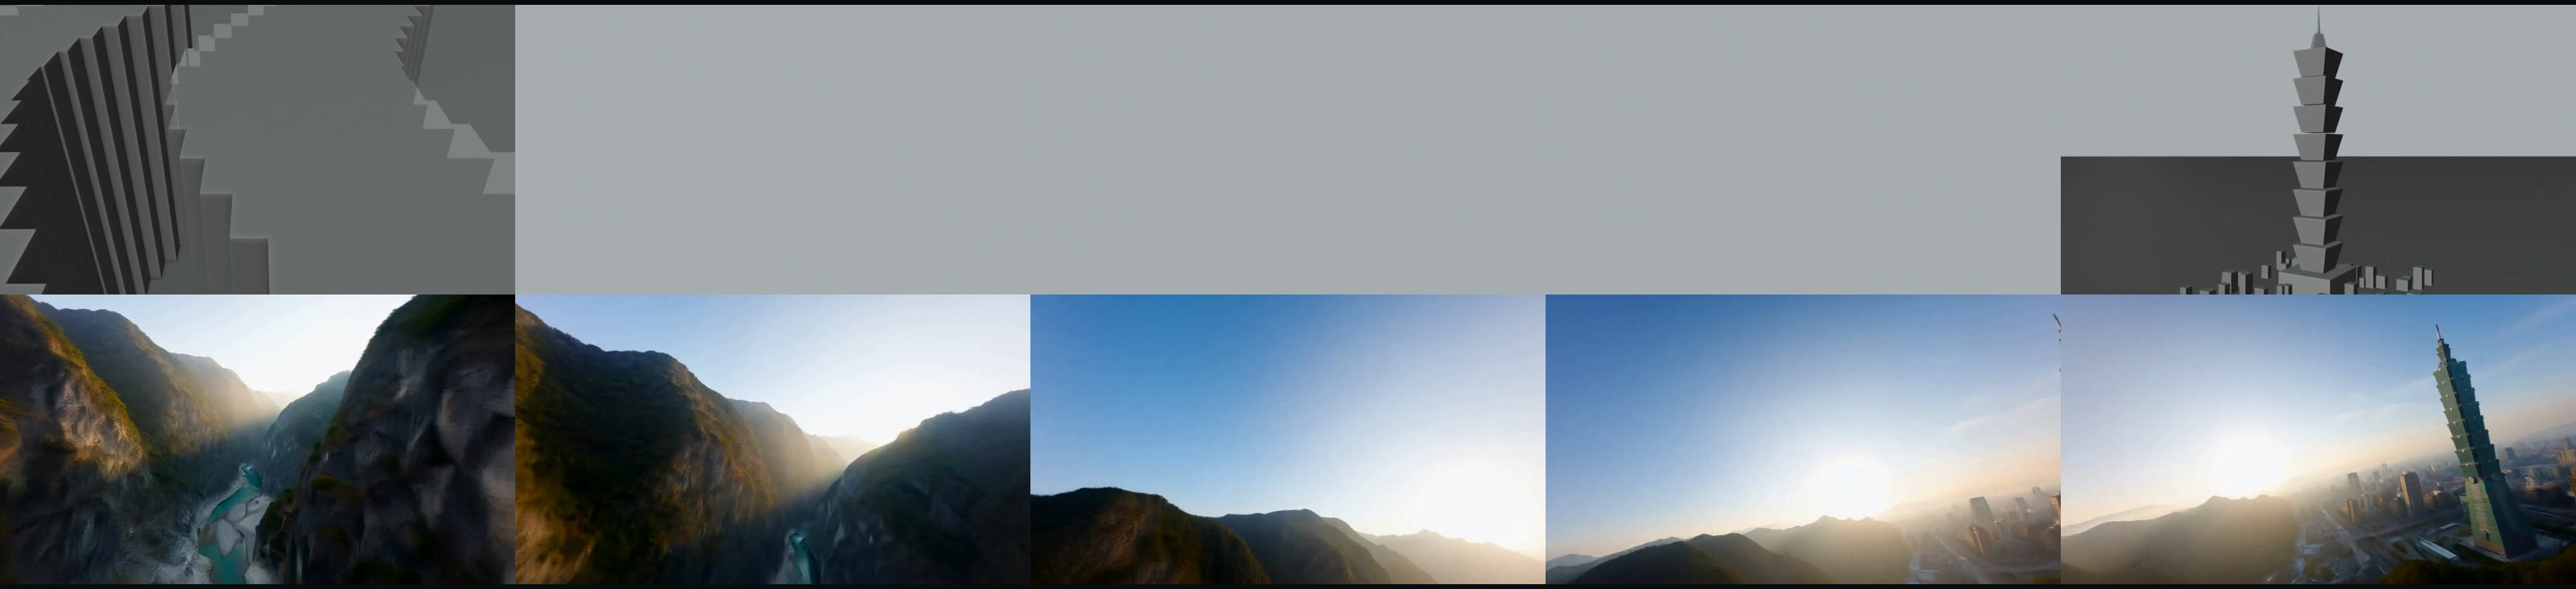
Each turn lasts 3 seconds. The middle 0.917 s (23 frames) is sky only: every landmark's bounding box is outside the camera frustum. Max pitch is +65°. If you want to know how Claude writes the blockout script itself, that's Part 9.
Here are the blockout and the H3 result playing in sync:
Left: the gray Blender blockout. Right: the MiniMax-H3 result. Both play the same 25 seconds in sync, so you can see each turn into the sky and each landmark reveal line up
And one turn broken into five frames:
Step 2: Install Continuum and use these settings
ComfyUI-H3-Continuum is MIT-licensed, needs no extra pip packages, and I used v3.9.8. Each chunk takes the tail of the previous chunk as context (22 frames with the Balanced setting I used), and the audio continues across chunks too.
cd ComfyUI/custom_nodes
git clone --branch v3.9.8 https://github.com/ukr8b3g-cmyk/ComfyUI-H3-Continuum
Restart ComfyUI, then start from examples/workflows/MiniMax_H3_Continuum_V39.json. The model is MiniMax-H3 Ref2VA from Comfy-Org/MiniMax-H3.
My settings:
Ref2VA model          minimax_h3_ref2va_pruned_nvfp4
Text encoder          qwen3vl_32b_minimax_h3_nvfp4_awq
VAE                   video fp16, audio fp32
Resolution            Manual, 1344×768
Steps                 20
Sampler / scheduler   res_multistep / simple
Seed                  2026101702
Chunks                5, 5 s each
Context               Balanced, 22 frames
Audio continuity      on
Video Reference Mode  Follow Timeline
Prompt                Timeline, [Chunk 1] … [Chunk 5]
Reference Use         Per chunk
Spectrum              off
Turbo LoRA            none
Finalize              buffer_backend = RAM
The Ref2VA file is my local NVFP4 quantization; that filename isn't in the official repo. If you don't have it, minimax_h3_ref2va_pruned_fp8_scaled or minimax_h3_ref2va_pruned_int8_convrot from Comfy-Org/MiniMax-H3 should stand in. The text encoder qwen3vl_32b_minimax_h3_nvfp4_awq is in the official repo.
Three of these matter more than the rest:
- Video Reference Mode = Follow Timeline. Each chunk gets the matching time window of the blockout. Otherwise every chunk is guided by the start of the blockout.
- Reference Use = Per chunk. Each chunk gets its own reference images (Step 4).
- Finalize buffer_backend = RAM. The automatic choice failed on my machine after all five chunks had finished. Details in the deep dive.
Step 3: Put the sky at frames 124, 243, 362 and 481
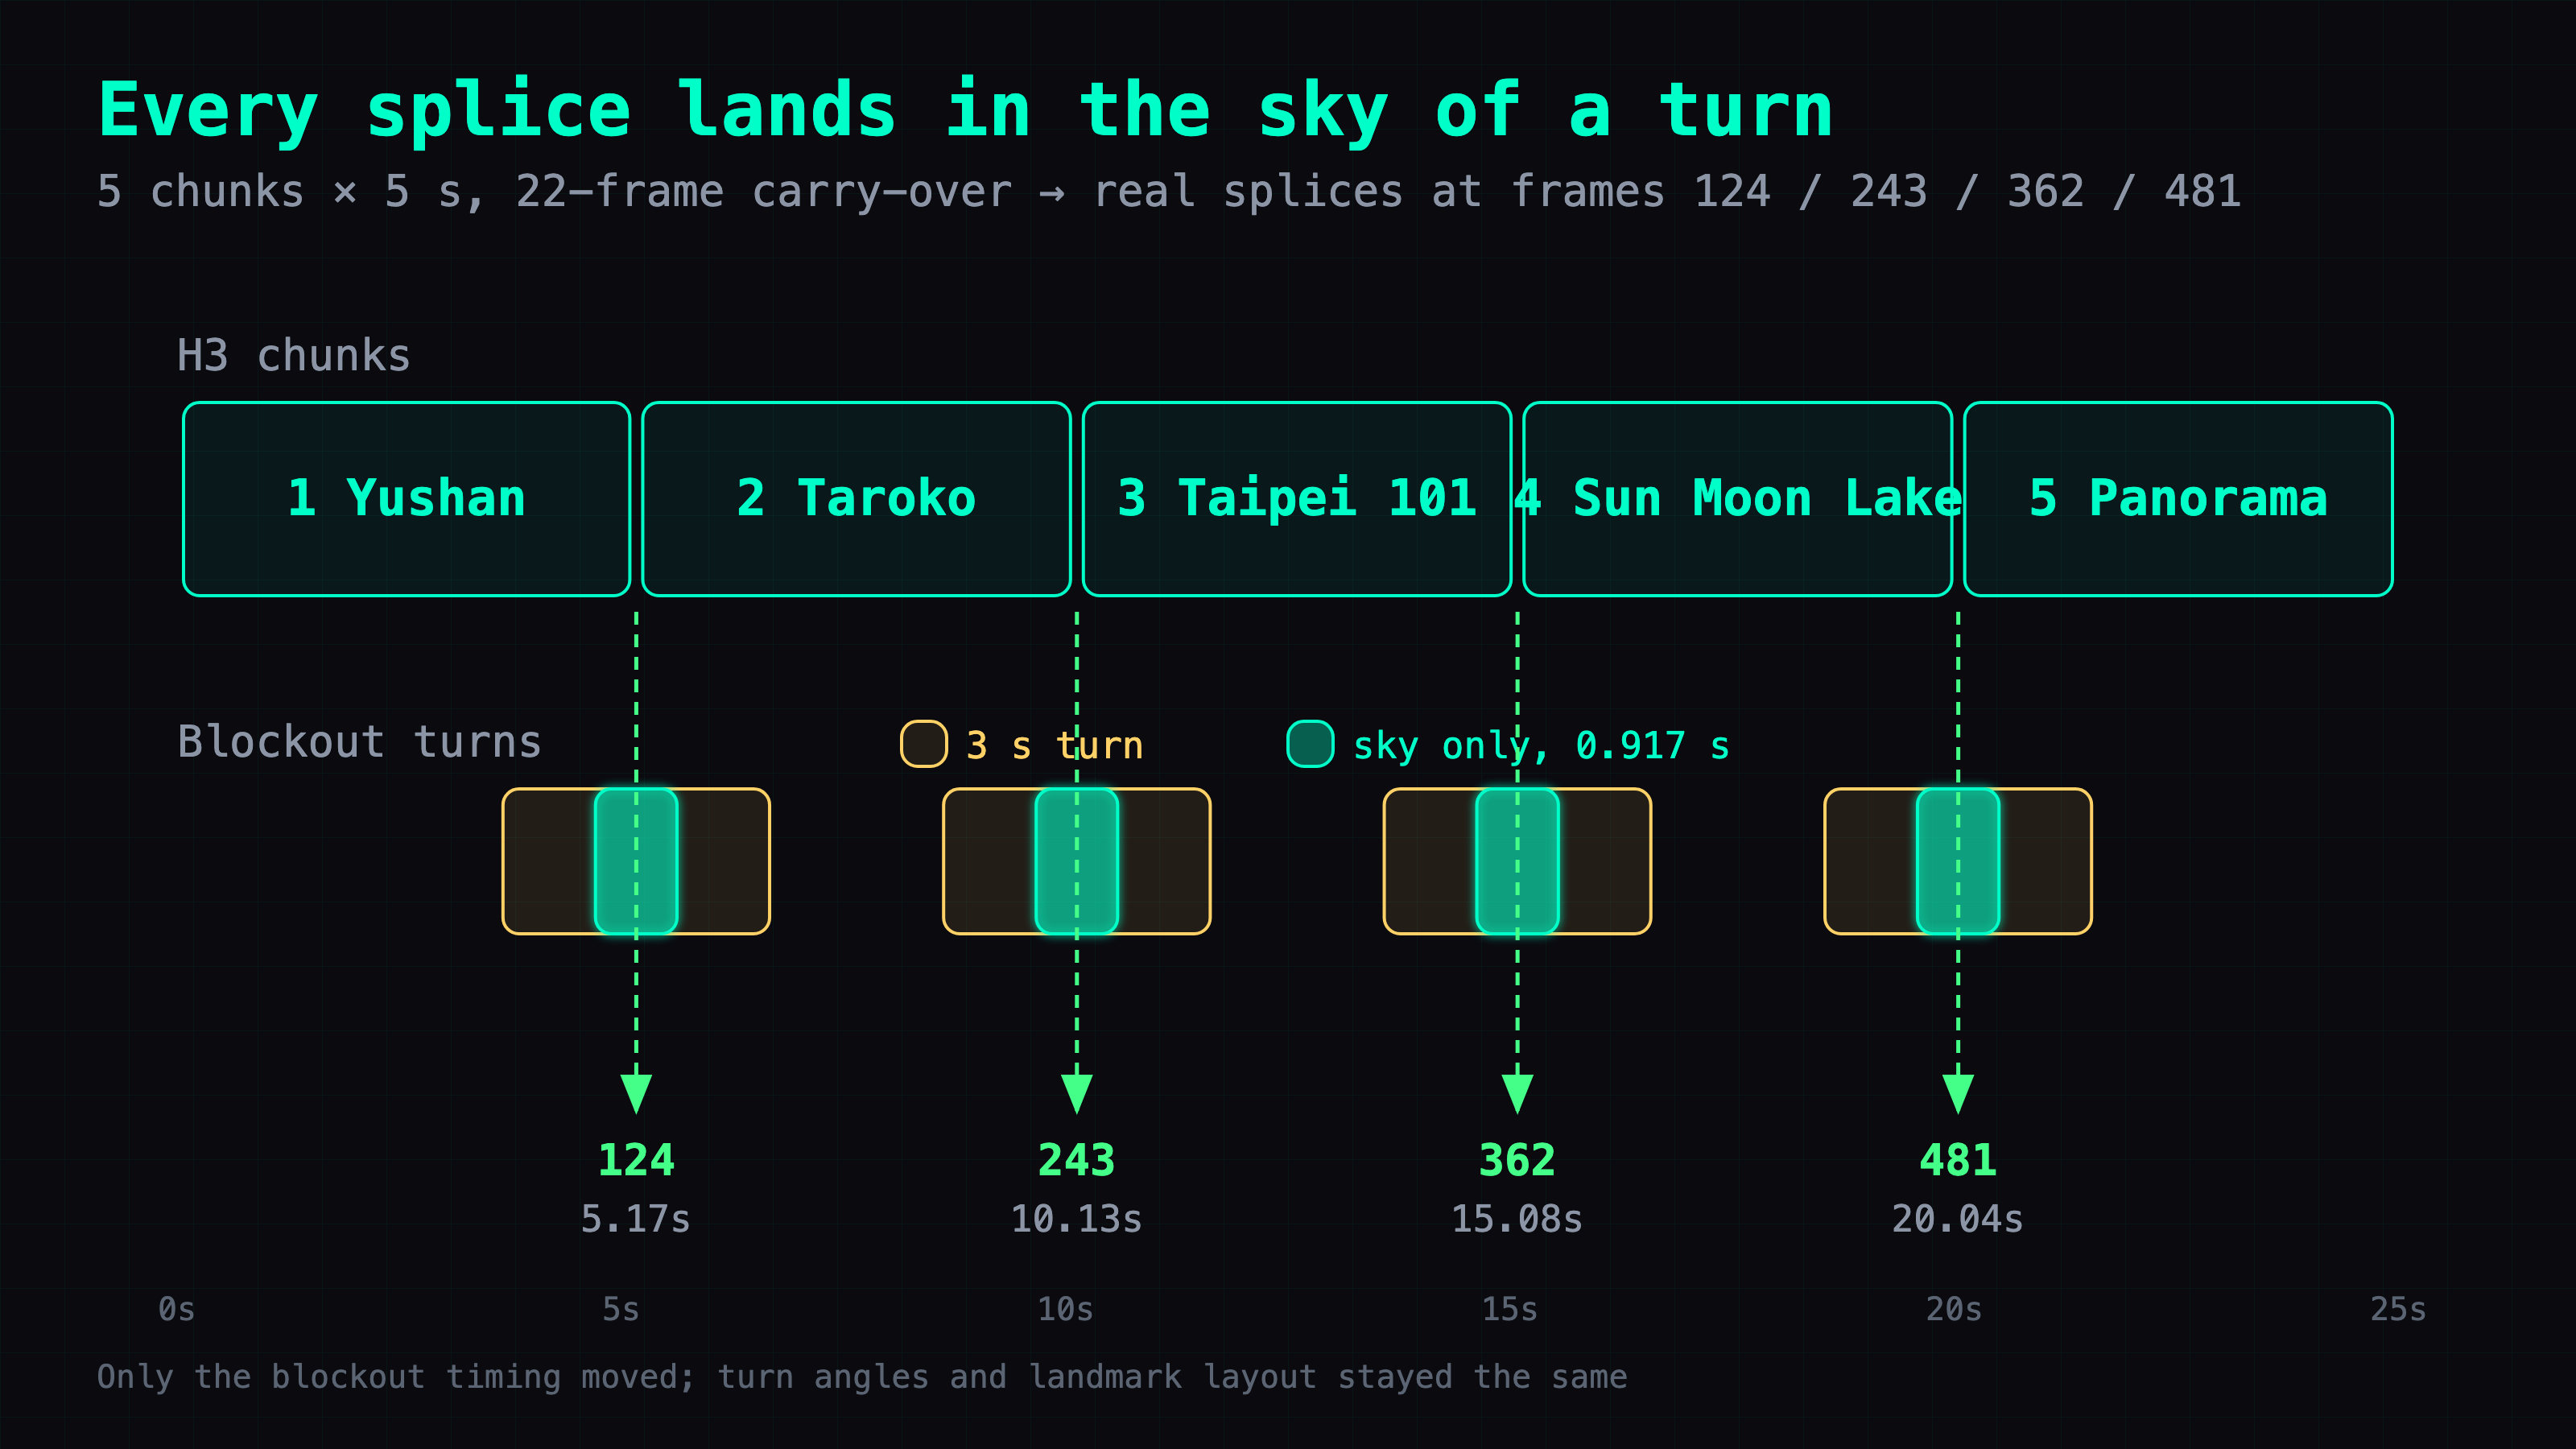
The splices don't fall on whole seconds, so the sky-only stretch of each blockout turn has to sit where the splices really are.
Chunks must all be the same length. chunk_seconds is one global value, and the Timeline headers ([0-5s] or [Chunk N]) only pick which prompt goes with which chunk. They don't change length.
Then H3's frame grid kicks in. Frame counts snap up to 17k+5. The first 5-second chunk asks for 120 frames and gets 124. Every later chunk generates 141 frames: the first 22 are carried over from the previous chunk, so each adds 119 new ones. The real splices land at:
- frame 124 = 5.167 s
- frame 243 = 10.125 s
- frame 362 = 15.083 s
- frame 481 = 20.042 s
600 frames is 25 s.
My first blockout put the sky midpoints at 3.5, 8.5, 14.5 and 20.5 s, which didn't match. In the second version I moved only the timing. The turns are still 3 s, the yaws are still 120/120/145/120, and the layout is identical. The sky midpoints now land exactly on the real splices, with zero error.
If you use 4- or 6-second chunks, recompute: round the first chunk up to the nearest 17k+5 frame count, add the per-chunk new-frame count for each later chunk, and retime the blockout turns so their sky-only stretches land on those frames.
Step 4: Give each chunk its own prompt and its own reference images
This is the step that broke my smoke test. I gave both chunks the same Fixed prompt (Part 10's full 0 to 8 s story for segment 1) and the same three reference images (panorama, Yushan, Taroko). Chunk 2 replayed the story:

Three fixes:
- Each chunk describes only itself, under its own
[Chunk N]header. Times inside a chunk are local seconds, starting from 0. - Write the turn as active camera motion, along the lines of: "camera banks hard right, pitches up across a clear blue sky, then dives toward" the next landmark. Each chunk ends in sky, and the next one resumes from sky.
- No fog words anywhere. No fog, mist or sea of clouds. Use clear, crisp visibility and a clean blue sky instead.
Here's the Chunk 2 excerpt as I wrote it:
[Chunk 2]
subject_definitions:
@R2 defines Taroko Gorge marble cliff faces and a winding turquoise stream.
@R3 defines the upcoming Taipei 101 tower, hidden off to the right.
detailed_description:
Local 0.0-1.50s: resume the same moving camera already looking at clean blue sky, finish the rightward turn and pitch down to reveal Taroko Gorge entering from the lower right.
Local 1.50-3.46s: accelerate above the winding river between distinct tall textured marble walls, banking into the channel with strong parallax.
Local 3.46-4.96s: make the next sharp rightward turn, pitching upward until only clear blue sky is visible.
You don't need to copy it. What matters is that each chunk says what it shows: where it starts (sky, except chunk 1), the landmark it flies past, and the turn into sky it ends on.
The reference images follow the same rule. Each chunk gets the landmark it flies past plus the one it turns toward:
| Chunk | Reference images |
|---|---|
| 1 | Yushan + Taroko |
| 2 | Taroko + Taipei 101 |
| 3 | Taipei 101 + Sun Moon Lake |
| 4 | Sun Moon Lake + panorama |
| 5 | panorama (five images after the redo below) |
They're the same Qwen-Image 2.1 images I made for Part 10.
Step 5: Pin the ending with five reference images
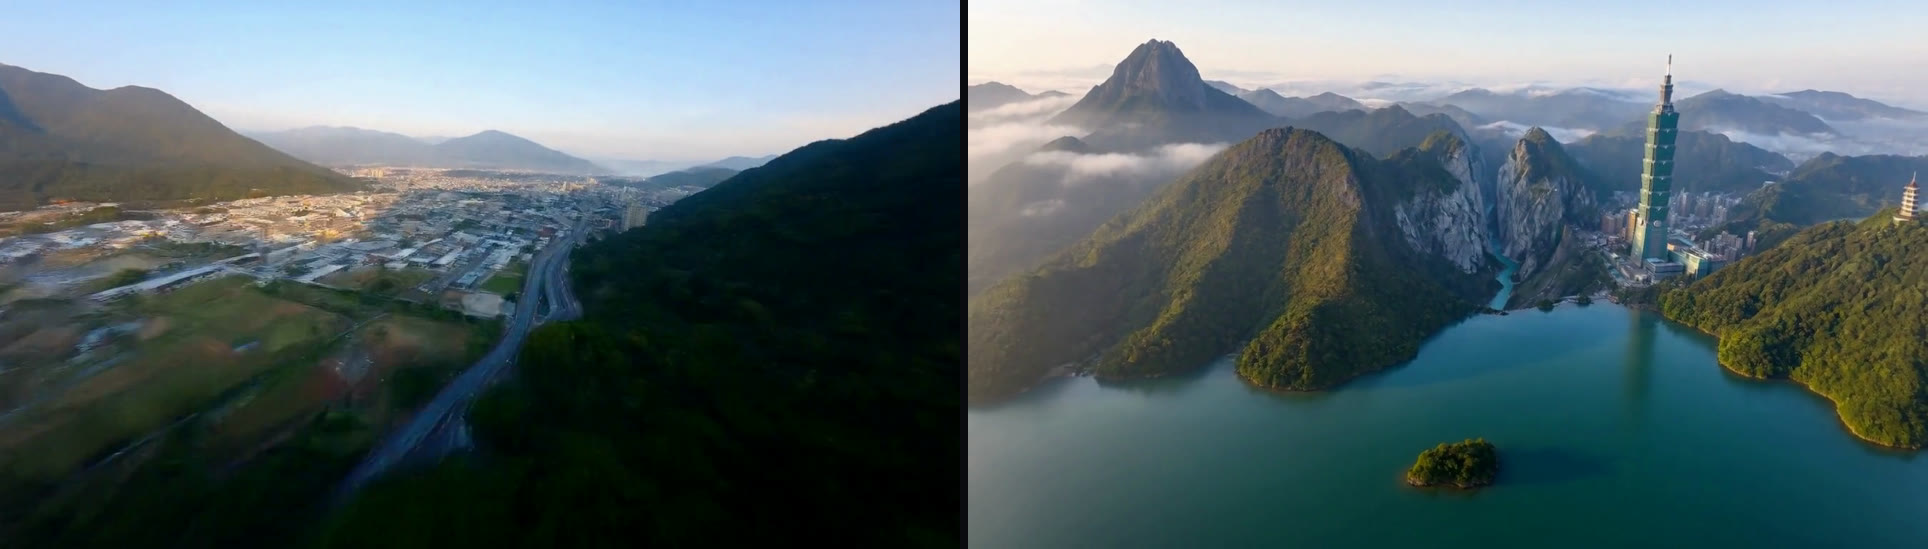
In the first full version, everything from 21 to 25 seconds was generic hills and a city. The closing panorama should show all four landmarks.
I changed only chunk 5. It got five reference images: panorama, Yushan, Taroko, Taipei 101 and Sun Moon Lake. Continuum allows up to 9 per chunk. The prompt pins each landmark to a zone, with no mixing:
- Yushan's main peak, far left
- Taroko Gorge, midground
- Taipei 101 and the city, right
- Sun Moon Lake with a single Lalu island, foreground
- stop climbing for the last 1.5 s
Attempt 1 had all four landmarks, but Yushan came out as a big mountain in the center, and there were two islands. Attempt 2 pushed harder on "distant standalone peak," "one island" and "stop pulling back." Yushan became a far-left peak, there was one island, and seam 4 measured 0.15×. That's the one I used.
Set run_storage to Save + Auto Resume if you might redo a single chunk
To regenerate one chunk, you need run_storage set to Save + Auto Resume before you generate. run_name is optional; set it if you want a fixed name. Runs are saved to output/h3_continuum/runs/. The progress preview is not a save.
I had it Off. So the ending redo was a full rerun, twice. It still worked out: with the same seed and unchanged chunks 1 to 4, the first 20 seconds came out nearly identical. But that's an extra half hour per attempt on one RTX 5090.
What's still off
- Sun Moon Lake shows up early. Around 13.5 s, in chunk 3, the lake appears behind Taipei 101, because chunk 3 carried the lake reference image.
- Duplicate pagodas and islands. Around 17 s there are two similar pagodas and several small islands. I only fixed that in the ending redo.
- Yushan is just a distant peak. It doesn't have the jagged ridge from the reference.
- The last 1.5 s still drifts up and back, despite the prompt.
- Not strictly fog-free. There are low clouds near the start and haze around Taipei 101.
- One seed per version. I haven't tested how stable this is across seeds.
Deep dive: the measurements behind each step
You can skip this section. It's the smoke test, the source-code rules, the measurement method and the failures, for anyone (or any AI) adapting the workflow.
Smoke test: shared prompt and references replayed the story
The smoke test used the old blockout's first 10 seconds as 2 chunks of 5 s, at 1344×768, with Follow Timeline. Generation took 710.354 s, VRAM peaked at 31687 MiB, and there was no OOM.
The seam was frame 123 → 124 (0-based), at 5.167 s. Seam MAD was 58.956 against a median of 10.099: 5.84×. Finalize itself flagged it: scene_cut=yes, motion_jump=7.11×, and it kept the native boundary.
The camera also didn't follow the blockout. At 6 s the blockout tilts against a gray wall while the generation shows an open summit. At 9 s the blockout is still on the wall while the generation flies forward through the gorge.
My take: the shared prompt and references made chunk 2 restart the story, and the old 10-second blockout was mostly gray wall filling the frame, which gave the model very little to follow. One run can't separate the prompt, the blockout, Ref2VA and Continuum as causes. That's why the production run changed all of them at once (per-chunk prompts, per-chunk references, the turn-and-reveal blockout).
What the Continuum v3.9.8 source says
These are why Step 3 works the way it does:
constants.py:chunk_secondsis a single scalar.v2/prompts.py: time headers pick a prompt by maximum overlap with the chunk; chunk headers map 1:1. Neither changes chunk length.temporal.py: the first chunk snaps to 17k+5 frames (120 → 124).v2/sequence.py:1049: each later chunk's target is the cumulative target minus retained frames, snapped to the nearest grid total (141), then trimmed by 22, adding 119. Cumulative totals: 124 / 243 / 362 / 481 / 600.- In the two-chunk smoke test the natural total was 243 frames. Finalize trimmed 3, giving 240 frames, 10.000 s.
_preserved_prefixkeeps nothing without a session, which is whatrun_storage = Offmeans in practice. That's why I couldn't redo one chunk.
How I measured the seams
- Decode with ffmpeg to 96×54 grayscale, 0 to 255.
- For each adjacent frame pair, take the mean absolute pixel difference (MAD).
- Baseline = the median of all adjacent differences, excluding ±0.5 s around each real seam.
- Seam ratio = the seam pair's MAD / baseline.
- Also record the window peak: the maximum ratio over the 25 pairs within ±0.5 s of the seam.
v1 seam numbers, and what the ending redo changed
In v1 the baseline was 7.017:
| Seam | MAD | Ratio | Window peak |
|---|---|---|---|
| 1 | 9.117 | 1.30× | 4.37× |
| 2 | 6.112 | 0.87× | 1.01× |
| 3 | 2.356 | 0.34× | 0.78× |
| 4 | 0.974 | 0.14× | 0.72× |
After the ending redo, the baseline was 7.107. Seam 4 MAD was 1.065, a ratio of 0.150×, with a window peak of 0.755×. Seams 1 to 3 were identical to v1 on a five-frame grayscale comparison; their MAD didn't change, so against the new baseline they come out to 1.28×, 0.86× and 0.33×, the numbers in the result table up top. In v1, Finalize Auto also applied a 1-frame exposure and color fix at seam 1.
Seam 1's 4.37× window peak is camera motion, not a cut
The peak sits at 5.333 s (frame 127 → 128), a few frames after the splice. After the pitch down out of the sky, the ridge enters fast from the bottom of the frame. That's the camera moving, not a cut, but the dive does start a bit abruptly.
A related mismatch at seam 2: the blockout shows only sky, but the generated frame keeps a ridge along the bottom edge. In v1 that seam measured 0.87×.
Finalize failed on disk space; the fix was RAM
The first production run finished all 5 chunks. Then Finalize Auto chose a disk buffer that needed 9,579,266,048 bytes (frames plus a 2 GiB margin). C: had 8,780,574,720 bytes free, so it failed.
The sampler cache wasn't kept. On the second run I changed only buffer_backend = RAM (49.37 GiB of free RAM at the time), and all 5 chunks were resampled: 1721.584 s.
C: is a 1.86 TB drive and had 8.2 GiB free, mostly taken by a 809.5 GB WSL ext4.vhdx. After cleanup it had 589.7 GB free. If you're on Windows with WSL, check that file before a long run.
Full reruns reproduced the first 20 seconds almost bit for bit
Both ending redos were full reruns. Chunks 1 to 4 had identical prompts, 2/2/2/2 reference images, the same blockout and seed 2026101702, and the runtime seeds were identical too.
Over frames 0 to 20 s (480 frames):
- Attempt 1: 476 frames identical, PSNR 72.54 dB.
- Attempt 2 (used): 477 frames identical, PSNR 73.729 dB. The only differing frames were 477 to 479, right next to the new chunk 5.
Seams 1 to 3 were identical. The seam 4 boundary was not bit-identical (MAD 0.974 → 1.065).
Timing and VRAM on one RTX 5090
One RTX 5090 32 GB, Windows, ComfyUI 0.37.0, 1344×768. VRAM sampled with nvidia-smi every 2 s, total 32607 MiB, no OOM anywhere.
| Run | Generation time | VRAM peak |
|---|---|---|
| Smoke test, 2 × 5 s | 710.354 s | 31687 MiB |
| Production, 5 × 5 s (second run) | 1721.584 s | 31696 MiB |
| Ending redo, full rerun | ~1814 s each | — |
The whole production run, including the CPU blockout rerender and measurement, took 72.96 min. The ending redo took 67.27 min. Audio is native AAC at 32000 Hz.
Coexistence with H3LongVideos
I already had H3LongVideos installed. Before installing Continuum I compared NODE_CLASS_MAPPINGS and frontend extension names (H3LongVideosV2, H3ShotLength, H3ModelInspector, H3Overlay): no collisions. After one restart both loaded with no import errors, and H3LongVideos' five .py files had the same SHA-256 before and after.
Related
FAQ
- How do you hide the seams between MiniMax-H3 chunks without fog?
- Put the next landmark behind the camera, off to the rear right, and make the camera turn toward it. In the middle of each 3-second turn the blockout shows only sky for 0.917 s (23 frames), and the chunk boundary sits there. With ComfyUI-H3-Continuum carrying the last 22 frames (Balanced setting) into the next chunk, the four seams measured 1.28, 0.86, 0.33 and 0.15 times the normal frame-to-frame change, and none of them reads as a cut.
- Why do ComfyUI-H3-Continuum chunk boundaries land at frames 124, 243, 362 and 481 instead of whole seconds?
- H3 frame counts snap up to the 17k+5 grid. A 5-second first chunk asks for 120 frames and gets 124. Every later chunk generates 141 frames, of which the first 22 are carried over, so each adds 119 new frames. That puts the real splices at 5.167, 10.125, 15.083 and 20.042 s, and 600 frames is 25 s.
- Why did my second Continuum chunk replay the story from the beginning?
- In my smoke test both chunks got the same full-story prompt and the same three reference images, so chunk 2 started the story over: frame 123 was a foggy gorge, frame 124 a sunny summit. Writing a separate [Chunk N] prompt for each chunk, and giving each chunk only the reference images for what it shows, fixed it.
- Can I regenerate only one chunk in ComfyUI-H3-Continuum?
- Only if you set run_storage to Save + Auto Resume before the first generation (run_name is optional). Runs then go to output/h3_continuum/runs/. The progress preview is not a save. I had run_storage Off, so redoing the ending meant rerunning all five chunks twice. With the same seed and unchanged chunks 1 to 4, the first 20 seconds came out nearly identical.
- How long does a 25-second Continuum run take on one RTX 5090, and how much VRAM does it use?
- Five 5-second chunks at 1344x768 took 1721.584 s with a VRAM peak of 31696 MiB out of 32607 MiB, and no out-of-memory errors. A two-chunk smoke test took 710.354 s and peaked at 31687 MiB.
- Why did Continuum's Finalize step fail after all chunks finished?
- Finalize Auto picked a disk buffer that needed 9,579,266,048 bytes, and the C: drive had 8,780,574,720 free. The sampler cache was not kept, so the fix, setting buffer_backend to RAM, still meant resampling all five chunks.
- Does ComfyUI-H3-Continuum conflict with H3LongVideos?
- Not in my install. Node class names and frontend extension names don't collide, both loaded after one restart with no import errors, and H3LongVideos' five .py files had the same SHA-256 before and after.
Read next
- 2026-10-16A 22-second Taiwan FPV flight without a drone: Blender blockout + MiniMax-H3 on one RTX 5090
A 22.7-second FPV flight that reads as one take, over Yushan, Taroko Gorge, Taipei 101 and Sun Moon Lake, built from a gray Blender blockout and MiniMax-H3 Ref2VA on one RTX 5090.
- 2026-10-12[AI Workflow] Block a scene in Blender, let MiniMax-H3 film it: local Ref2VA on an RTX 5090
Block out a shot with capsules and boxes in Blender, feed it to MiniMax-H3 Ref2VA with two reference photos, and get a live-action clip that keeps left/right order and occlusion. 89.9 s on one RTX 5090.
- 2026-09-06[Benchmark] Two characters in one shot: MiniMax-H3 Ref2VA takes multiple reference images
Ref2VA is the only MiniMax-H3 mode that takes several reference images. Two characters, 243 frames, 437 s on one RTX 5090, and CER 6.8% on the dialogue.
- 2026-09-13[Benchmark] Roll cheap, then enhance the keeper: NVIDIA's two-stage MiniMax-H3 + LTX-2.5 pipeline explained
NVIDIA's Sol-H3 two-stage recipe on an RTX 5090: MiniMax-H3 drafts at 672×384 in 25.5 s, LTX-2.5 refines only the take you keep. Downloadable ComfyUI workflow.
Don't miss the next one
Subscribe, and you won't.
One-click unsubscribe anytime.